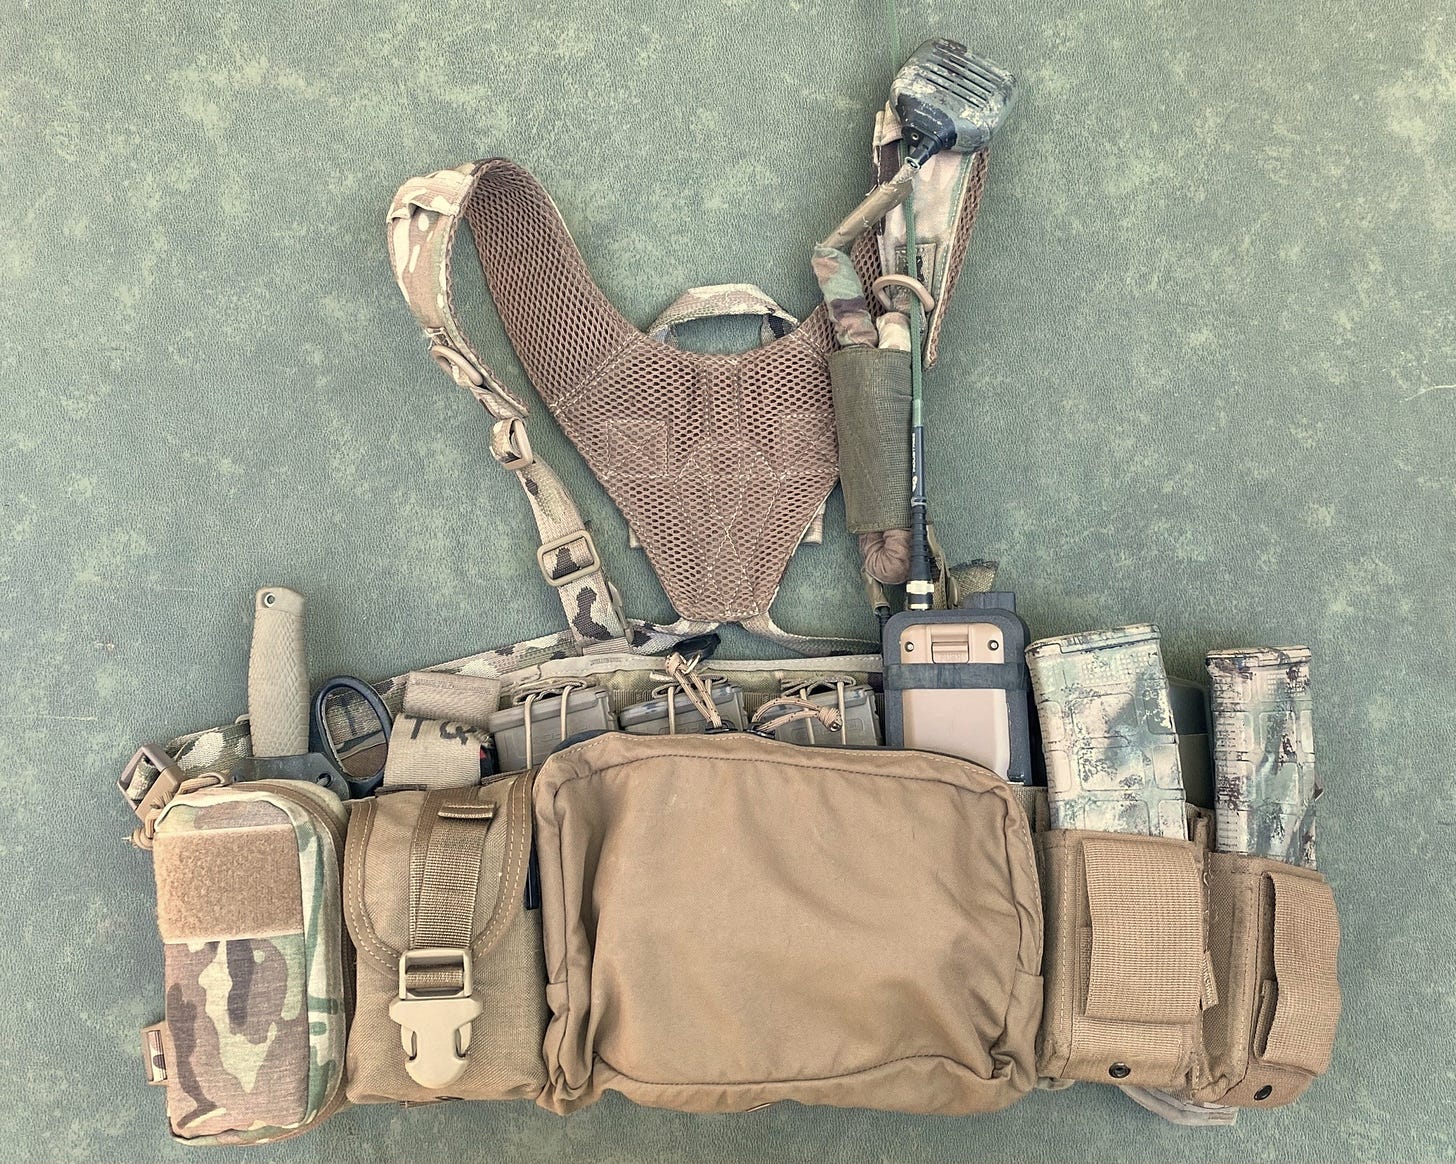
I’ve gone around and around on setting this system up and it usually ended in too heavy of a setup, hitting 19lbs at times, or making it so thick that it put weight too far in front of my center of gravity.
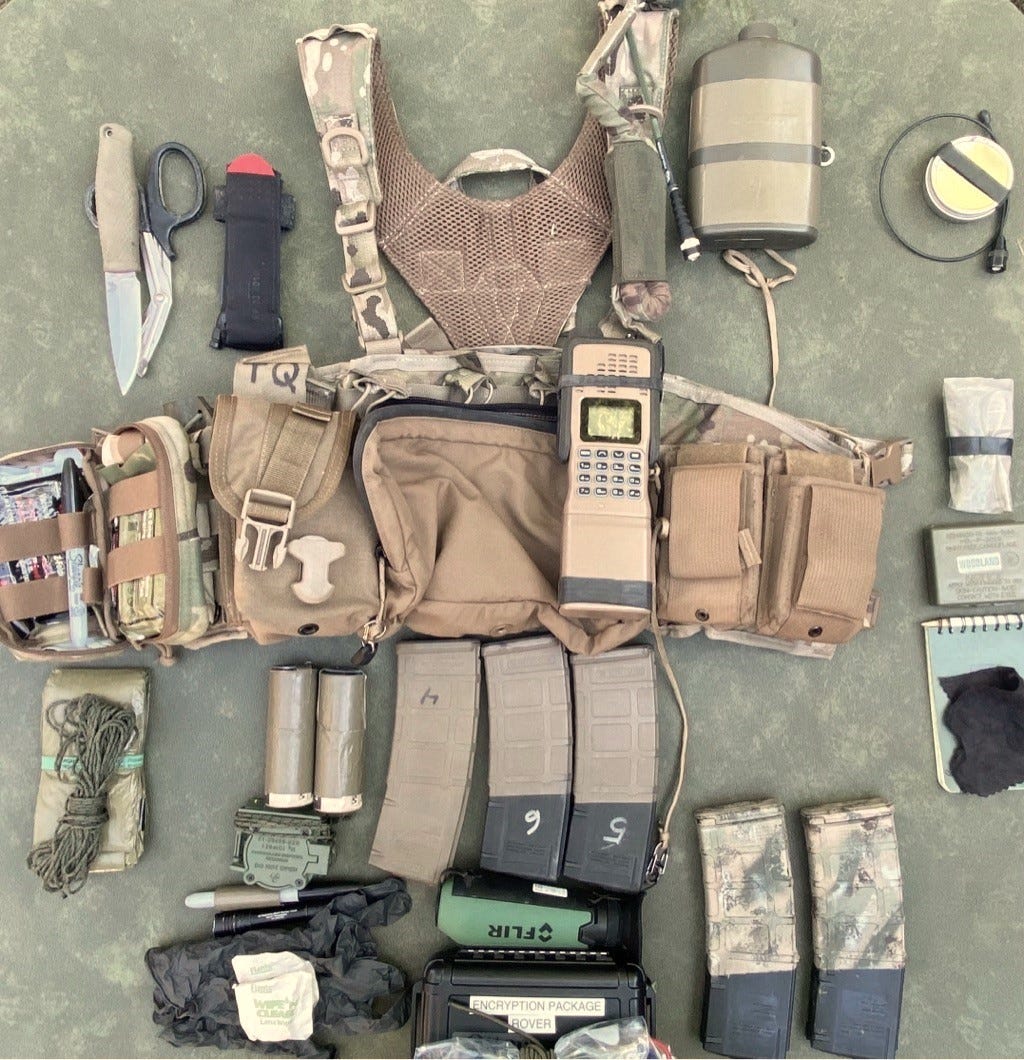
This time around I feel I have found a combination that seems to keep the “felt weight” down by moving it closer to the body (canteen) or into the pack (nods), creating a better balance of the rig overall. The rig still has all the “must haves” (ammo, medical, water) for a second line IMO, as well as some admin tools.
As far as using a “heavy / fat rig” and those “Internet Experts” whose complaints are that “anything deeper than a magazines thickness on a chest harness is going to get you killed” because you can’t hug the ground when you have incoming rounds. I disagree obviously. Grunt Proof made a great video addressing this strawman and I’ll leave it here for your education.
As far as paring down the rig, one of the things I had to realize is that you can’t put it all on a chest rig, you are going to have to combine it with a 3-Day Assault Pack if you need more than the essentials of ammo, medical and water.
The Chest Harness must remain geared towards bullets and band aides. Not be turned into a catch all rig.
Anything other than a short property or community patrol is going to see me adding the assault pack to this kit when night vision, radio encryption, extra mags, extra water, etc. is needed.
While my plan is to always have my LINE1 gear on me in the form of my E&E Fanny Pack, I do want to keep a means of fire on my LINE2 as well as a full BOK and some means of water and purification.
Layers upon layers is the way, “two is one” and all that!
USMC 3-Day Assault Pack
Additive equipment for hot weather or to plus-up Line2 gear.
^ = as needed
Source 3ltr reservoir
^ Command Kit
Cammenga Trit Lensatic Compass w/ dummy cord
Compass tool
Laminated AO Map
Map Compass tool
Mil-Dot Master
Rite-in-Rain, pencil, map pens in notebook
^ Encryption Package
Powerbank / Multi-type pwr cord
Android phone w/ Ribbit
^ Sniper Veil
^ Thermal / Scrim cover
^ (6) AR15 Mags
^ NOD Package
Pano Bridged PVS-14s
Team Wendy helmet
CURRENT TAPS CHEST HARNESS SETUP
One additional hack to the rig I recently made was to remove the divider between the far two left mag pockets (as worn) which allowed me to place a GI pint canteen in this space, putting a heavy item against the body instead of hanging it outside of the “magazine layer” in front of my center of gravity. It can handle a GI quart canteen, but I prefer the lower profile of the pint.
I also picked up a few speed-reload mag pouches and the admin pouch from Venture Surplus for $53.86 delivered and the “used” speed pouches where like new as I’ve come to expect from them.
The speed reloads fit P-Mags perfectly IMO, although the retainer flaps are made for metal mags, which matters little as they are able to be put out of the way via Velcro and were bought for speed reloads not retention. The Admin Pouch has a water-resistant zipper and is basically a large easy to access pocket, I do wish the divider came up a little higher though.
One of my pet peeves with chest harnesses is that a carbine resting across them usually creates a hard contact between the charging handle or stock with the magazines in the chest harness. By adding the soft admin pouch in the twelve o’clock position, I created a soft point that the charging handle has no ledge to catch on or clank on.
Something to consider is that by the time I got the TAPS into the configuration that worked for me, the price as it sits today is/would be $178.00
Used TAP Panel (~ $60.00)
TT Harness (~$50.00)
Admin & (x2) Speed pouches (~$54.00)
SR25 Pouch ($14.00)
At nearly $200.00 you are getting into some very nice rigs in that price range, there is not one out there I’ve found though that would serve me better than this setup, at least none “out of the box” for < $200.00.
If buying off the shelf, I would get the Mayflower Punisher and be done with it.
For me, it’s the most bang for the buck, but it’s something to consider before attempting to upgrade the $60.00 TAPS.
KIT MISSION
Mission is Short Community Patrols / Vehicle Ops / Longer Patrols with a Pack.
BACK SIDE POCKETS
LEFT
Glass cleaning cloth
Glass wet wipes
Surgical gloves
CENTER
Sm. R-N-R Notepad
Face paint
Spare antenna
Knife sharpener
IBU
Ferro Rod / carbide striker
30min Water Pur Tabs
Beeswax Candle
RIGHT
Micro cord (16ft)
E-Bivy
BACK ROW BUILT IN POUCHES
My Right to Left
Knife / Shears
TQ
AR15 Mag 5
AR15 Mag 4
AR15 Mag 3
Baofeng AR-152 / Kenwood Mic
GI Pint Canteen
OUTER MOLLE ATTACHMENTS
My Right to Left
NAR BOK / CAT-T TQ / OD Cravat / Sharpie
SR25 Pouch
Cammenga Tritium Lensatic Compass w/ dummy cord
Tactical Smoke x2
Sharpie w/duct tape
AAA Pen Light
Admin Pouch
Photon Press light (Green/Blue) zipper pull
Thermal monocular
Command Kit (as needed)
Compass tool
Laminated AO Map
Map Compass tool
Mil-Dot Master
Rite-in-Rain, pencil, map pens in notebook
Quick Mag AR15 Mag 2
Quick Mag AR15 Mag 1
PAST REVISIONS
I’ve done two previous posts on the TAPS chest harness and if you are interested in the progression I’ve taken, the posts are below.


As a guy who wears a chest rig more than any other type of system (Mayflower R&D Gen VI Pusher or Tyr COMA Sniper, which is more of a hybrid), good write up.
As a counterpoint to Gruntproof, the thickness issue isn't only about going prone. See 10:45 for another reason:
https://youtu.be/3Sh1gNW4yeI?feature=shared
Also, for me, it's more about weight distribution and back health - the more weight I have on my front, the more my back screams at me.
Those are the reasons *I* choose to stay as slick as possible in the front. One day, someone will develop a perfect, do-it-all system. Until then, I just juggle various setups based on current task. Chest rigs definitely fall in that rotation.
Dang awesome I keep changing around my taps also to where it works for me … I’ve started a second one to attach to my plate carrier…keep up the good work and post…