What follows will my attempt at a “one-stop shopping post” for getting someone from “zero to hero” on this HT and how to use this particular radio as the basis for a tactical comms setup.
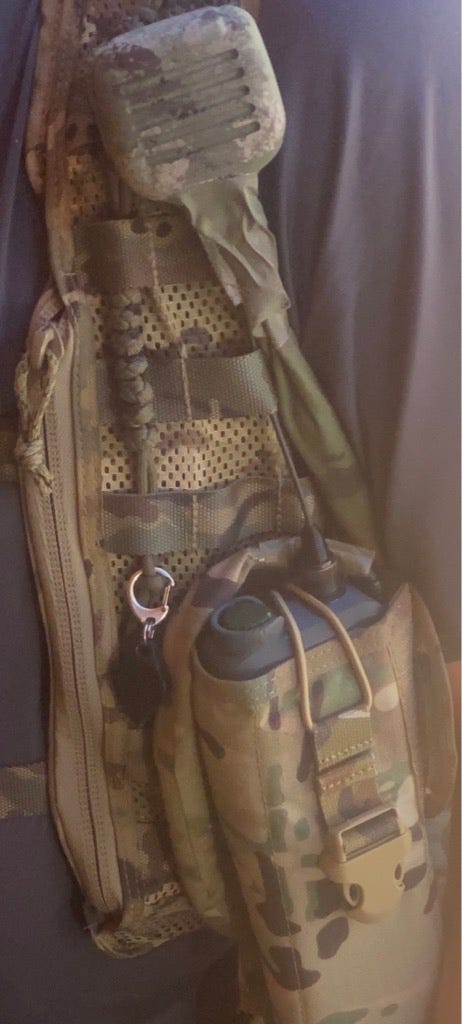
If someone were to ask me “what should be my first radio?” this post is my answer for them and the reasoning behind it. It’s exactly how I have my field setup, based on this radio.
POINTS COVERED IN THIS POST:
The AR-152 Operator’s Manual
Using CHIRP to program the radio.
Establishing a Freq / CTSS plan.
Programming X-Band, aka. “SPLIT” channels for use with a Tactical X-Band Repeater.
Creating a printable “cheat sheet” for the back of radio.
Enhancing / Degrading your signal via antenna choices.
Using Burst transmissions to lower your SIGINT exposure.
Capturing local signals with Band / CTSS scanning.
Recharging and alternate power sources in the field.
1. WHY THE BAOFENG AR-152?
“I THOUGHT YOU WERE ALWAYS SAYING FENGS SUCK!?”
I was and still do when it comes to the UV-5R, but this particular model has promise even though is basically the same radio in a new wrapper.
With an aluminum under carriage and improved filtering, it has passed a few tests that NCSCOUT has put it through in his classes and he recommends them, which was the main reason I even looked into one. When a guy of NCSCOUT’s experience says something is worth a look, I’m going to check it out for myself.
While I was searching for more information on the unit, I came across this torture test on YouTube and decided it was field worthy enough to take a chance.
I don’t get too worried about IP67 (waterproof) radios because in reality, it’s like your weapon, you have to take care of it and IP54 will keep it protected just fine as long as you are not dropping into a stream and leaving it there. The AR-154 is IP54 and you can see from the test in the video that it will handle a drop and snatch from a stream easily.
RADIO PROS:
The main selling points of the AR-152 are:
Extremely long standby time. (mine lasts 5 days)
Large screen and size of radio for ease of manipulation.
Rechargeable without a cradle from any 12vdc source (using car charger) or USB Micro connection and USB power bank.
Can use the BTECH cable for burst transmissions from Android devices.
CHIRP programmable.
Stress tested beyond reason. (see video above)
RADIO CONS:
The battery input is 10vdc like most Chinese radios, instead of the more common 12vdc sources, so you will need to either step 12vdc down via the car cigarette lighter adapter (not included) or use the slower USB-A cable to charge in the field.
Old Kenwood 2-prong mic connection.
They are known for falling out, but a ranger band fixes this easily.
They are also a plus as the BTECH and other cables using this connection are easy to find.
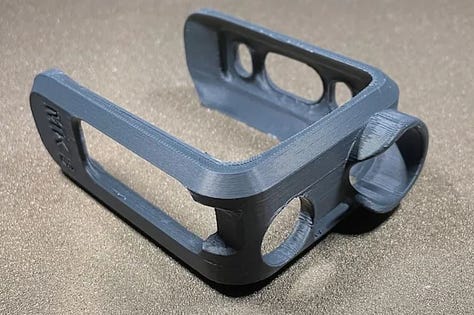
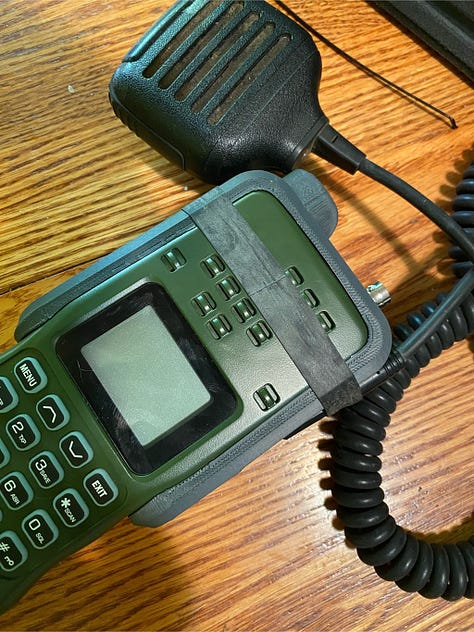
Flashlight and emergency button are waiting to give your position away if accidentally bumped. The 3D printed Exo-Skeleton prevents this for $20.00 delivered.
2. BUYING THE RADIO, ACCESSORIES, AND UPGRADES.
While I prefer to give a fellow patriot business, if Amazon is substantially lower in cost (usually shipping) I will save some money and be assured of purchase protection via their return policies.
In the case of the AR-152, NCSCOUT’s store had them for the same $69.99 as Amazon, but his shipping calculations are obviously based on the cart total and not actual shipping costs. I saved $17.00 in shipping using Amazon prime, and while I could have bought everything off Amazon, I bought the rest from NCSCOUT’s website.
RADIOS
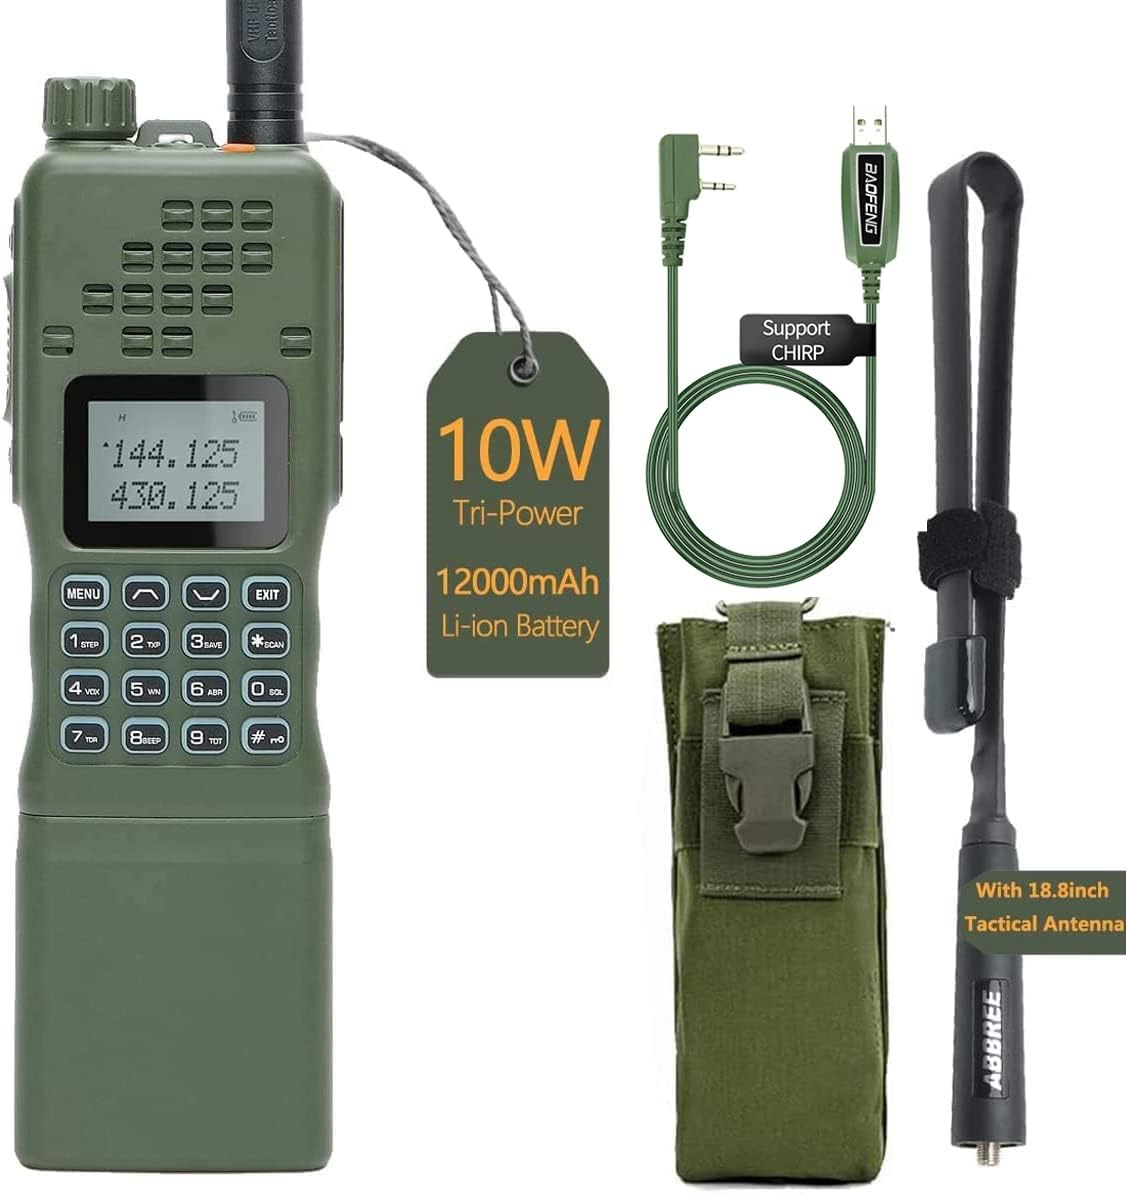
Amazon link to just radio, chargers, antenna.
If you have a program cable for any Baofeng this is all you need.
Brushbeater Store link to just radio, chargers, antenna
If you have a program cable for any Baofeng this is all you need.
ANTENNAS
NCSCOUT’S favorite antenna for this radio.
Signal-Stuff BNC Super Antenna
My favorite antenna for any handheld.
ACCESSORIES
Allows silent sending of RATTLEGRAM / AndFLmsg data.
The Guerrilla's Guide to the Baofeng Radio - Field Version
If you are new to radios, you want this book!
3D Printed Exo-Skeleton ($20.00 delivered)
The Printer for Hire I used.
3. PROGRAMMING
CHIRP (Free Programming Software)
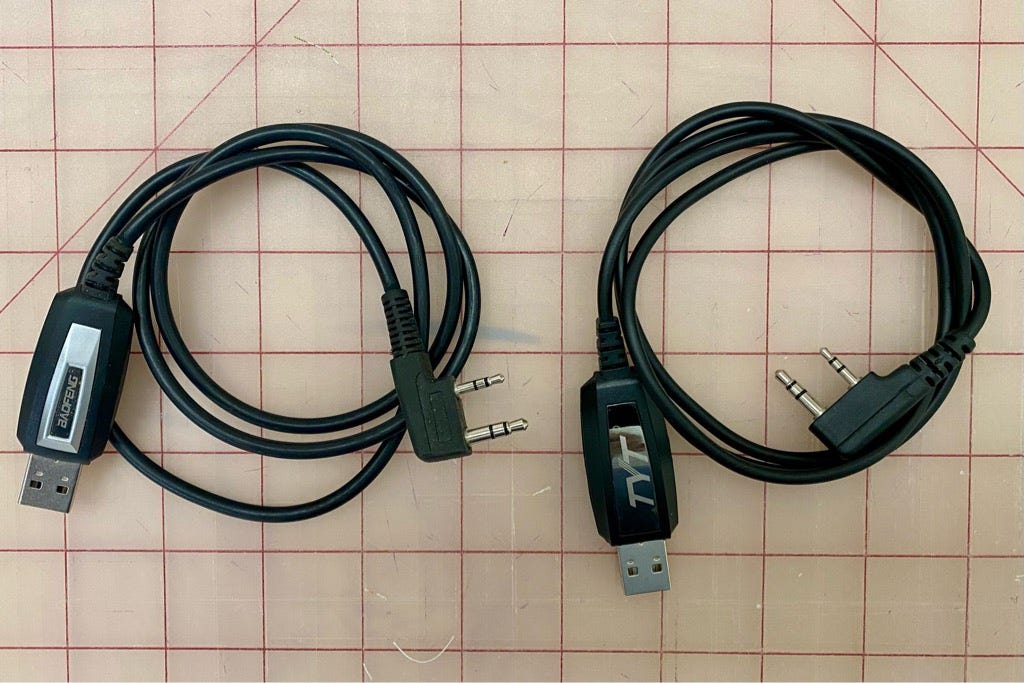
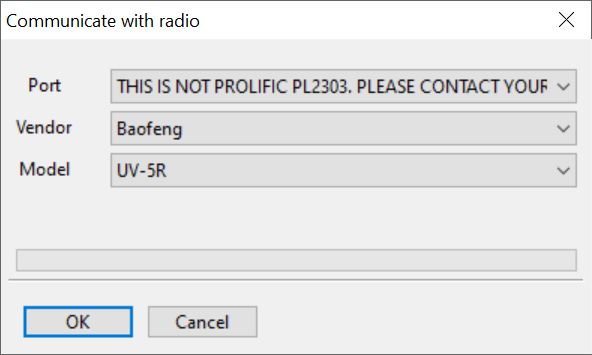
The first thing you need to program via CHIRP on Windows is a genuine “Prolific Driver” programming cable.
Windows does not allow the use of counterfeit cables (which my Baofeng labelled one on the left is) compared to the TYT cable on the right which is a Prolific cable.
Hopefully the one coming with new Fengs is no longer a “knock off” of the Prolific, but you can always search on Amazon for Prolific cables with the Kenwood 2-pin and it should work. I recommend the BTECH cable.
If you get the error shown below while attempting to connect via CHIRP, this is why.
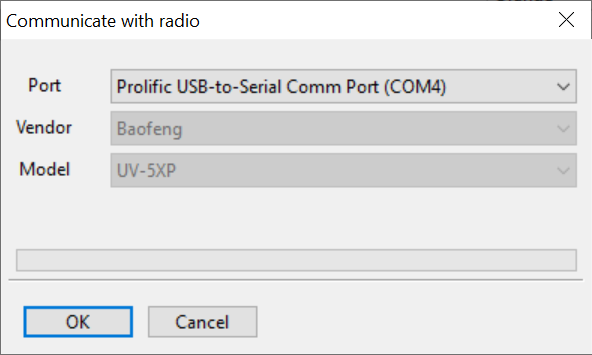
Once you have the proper cable it will connect. If you do not have a Prolific Driver cable already, I would use this one from BTECH.
Notice the Model profile is not yet available for the AR-152, but by using the UV-5XP profile you can get LOW/MED/HIGH power settings unlike the default UV-5R profile.
MY PREFERRED SETTINGS
If they are not listed here, then I’m using the default settings.
This is for a permissive environment, should things get really hot, the radios are to be operated in VFO mode only with a primary freq and alternate freq entered into VFO-A and VFO-B but not saved so that they can be quickly moved off channel.
BASIC SETTINGS
Nothing worse than a loose squelch. If you absolutely need to hear someone far away you can hold the bottom button to remove squelch altogether. I keep mine maxed at the highest setting of nine.
The factory setting of 1:3 gives me 5 days of standby.
Set this to ZERO to disable the backlight, then the other BL Settings do not matter. There is no reason to have a backlight on a tactical HT in the field IMO. It can only give your position away.
Obviously, we don’t want beeping going on.
This is personal preference, but I prefer to leave it at the default 60sec and protect the PTT button via the Exo-Skeleton and monitoring the radio display when using VOX.
I use the NAME feature to name my freqs, if things are kinetic and this radio is used in a group setting were the fear of them falling into the hands of the “enemy” is a real thing, it would be wiped and set to VFO mode only.
Doesn’t matter with ABR set to ZERO, leave default.
This should be disabled ASAP for obvious reasons.
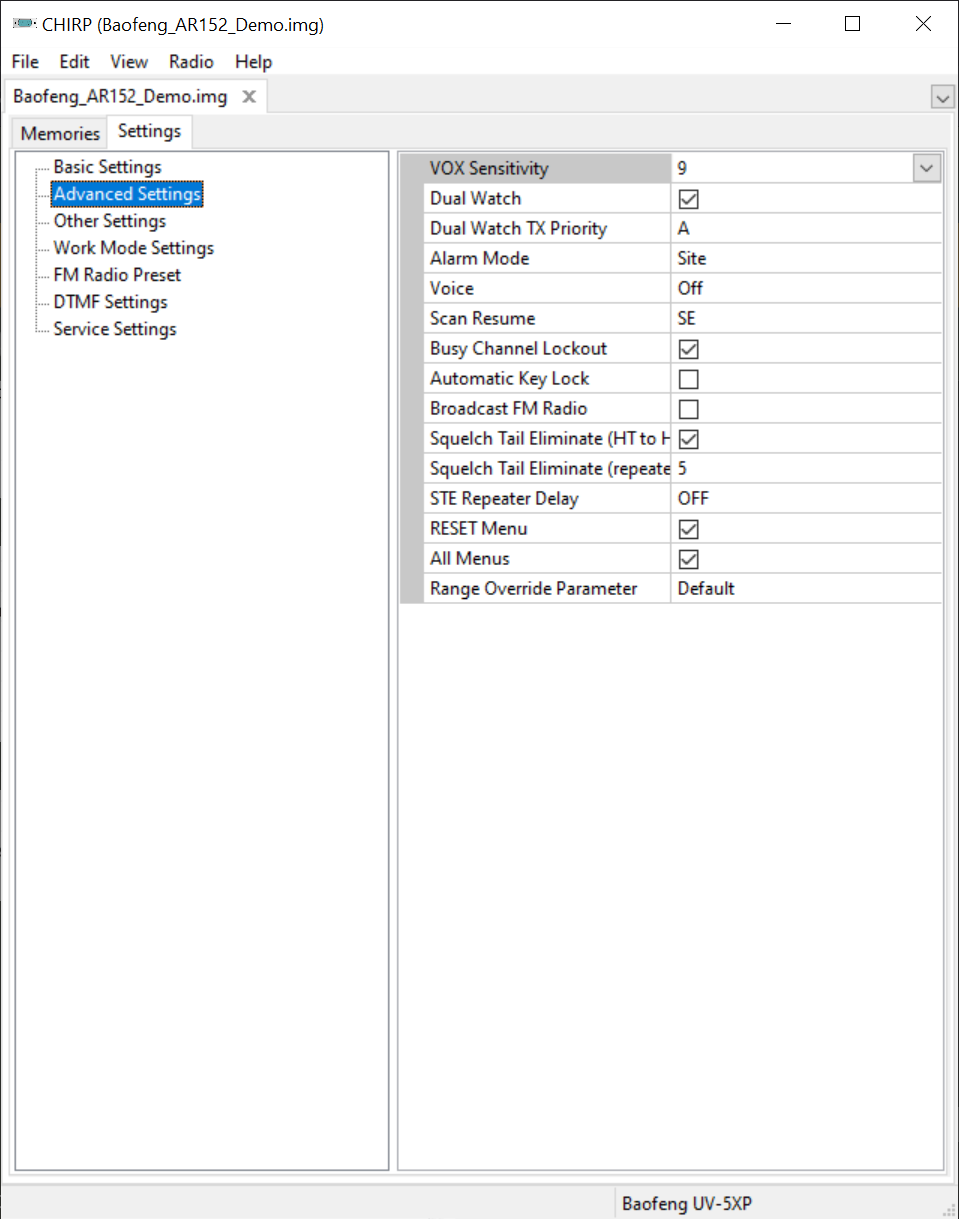
ADVANCED SETTINGS
Do not use VOX unless it’s in a controlled environment like the RATTLEGRAM burst traffic mode where you are eyes on the screen at all times. Get use to turning VOX on and off seamlessly. It’s one of the main settings I have a cheat sheet on the battery for.
One of the nice things about the larger screen on the AR-152 is you can actually see this little arrow now.
SE: allows you time to get to the radio faceplate to see what freq is transmitting.
This prevents you from “walking over” another station on your freqs.
Sounds like a good idea but gets annoying when you don’t want it locked. I prefer to use the lock button on the faceplate when putting the radio back in the pouch.
If this is on, the top button changes the radio to the FM receiver and your radio is now useless as a transmitter until you push the button again. Disable this and you disable the top button also. You don’t need an FM radio and if you do you can turn it on via the MENU button.
Get rid of extra noise.
The rest of the settings I leave at default.
WORK MODE SETTINGS: NON-DEFAULT
VFO A Power = Low
VFO B Power = Low
This only affects channels you manually put in on the VFO (Menu Long Press), has no effect on programmed channels.
ESTABLISHING A FREQ / CTSS PLAN
A few years ago, I setup a freq plan while programming my handout radios, because I needed standardization between all radios. This is something you want to spend some time considering as one added channel requires all radios to be reprogrammed.
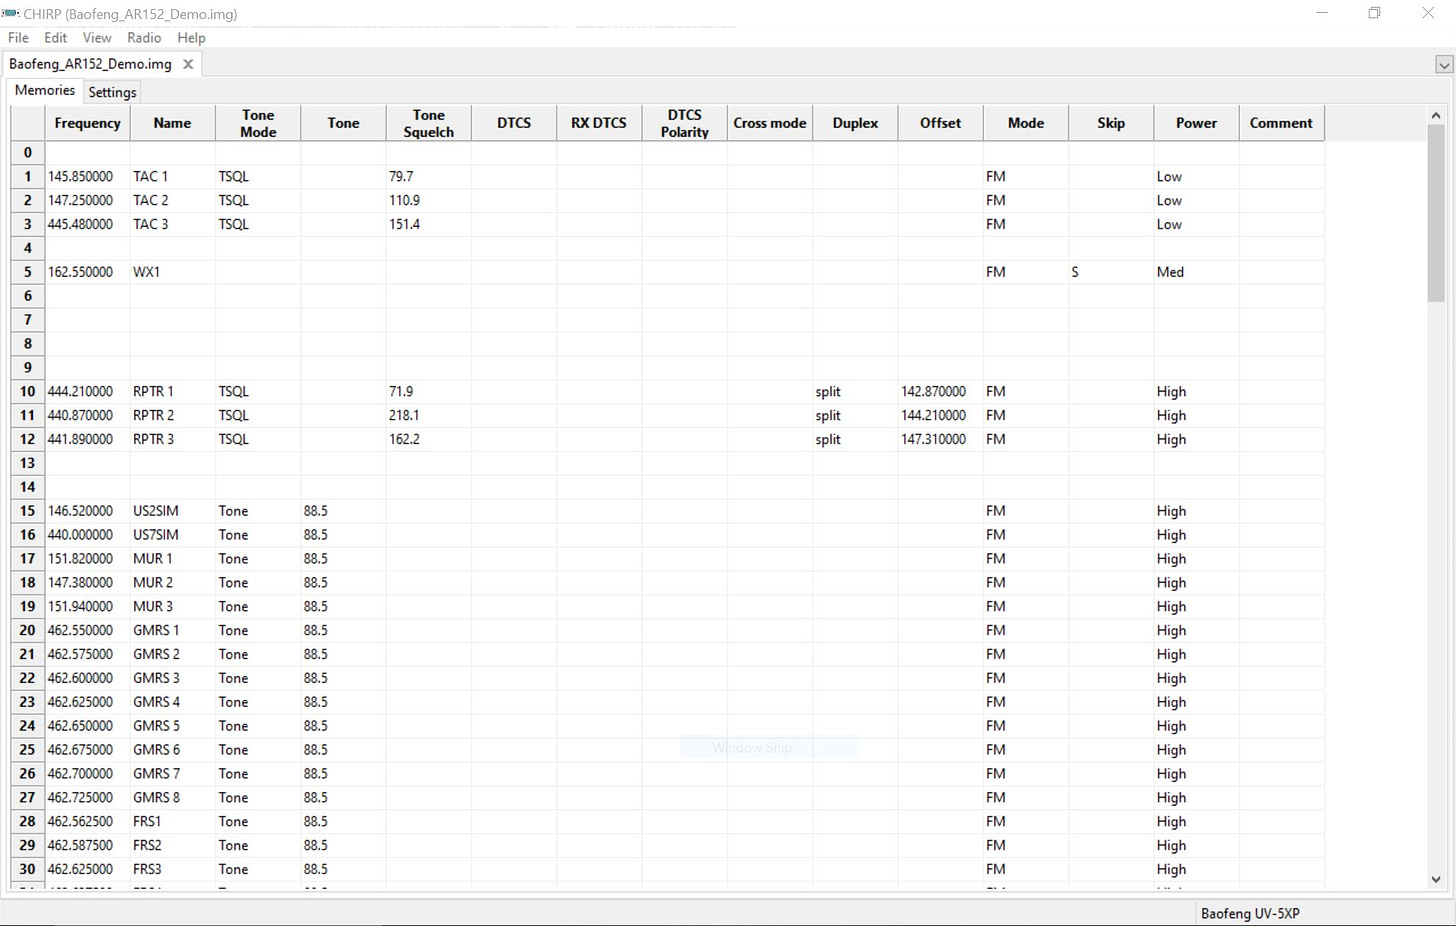
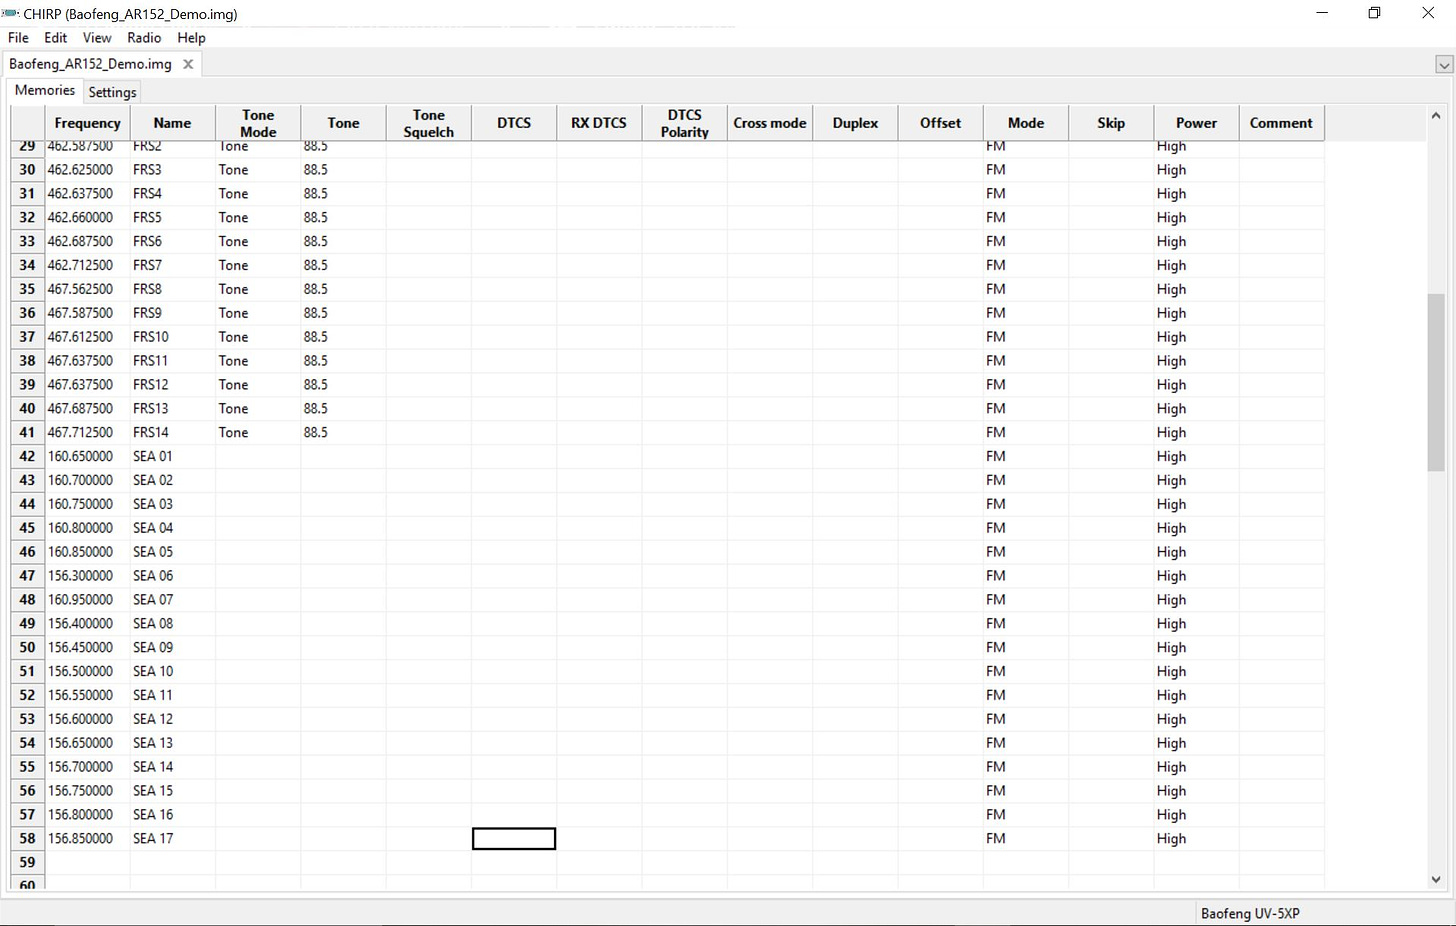
My base order of freqs is found in the CHIRP images below and included in this CHIRP image: Baofeng_AR152_Demo.img
Upon this is added local repeaters and EMS using the REPEATER BOOK and RADIOREFERENCE (paid) import feature in CHIRP.
NOTICE THAT CHANNEL 0 (ZERO) IS NOT USED!
This is because many radios start with channel 1 only, and this will make your CHIRP file work with many more radios for future use without having to reprogram everything to accommodate for this issue.
Notice the weather station is set to be skipped when scanning channels. I set all the repeaters to be skipped also to reduce the number and cycle time to be a more effective scanner.
A few tactical channels are the primary use channels and are set to LOW power to reduce signal capture chances, also is an x-band repeater setup example included that I use with my repeater, feel free to change slightly to fit your own needs if you like.
I start my repeaters section at channel 70 and EMS at channel 100 for ease of finding in the field.
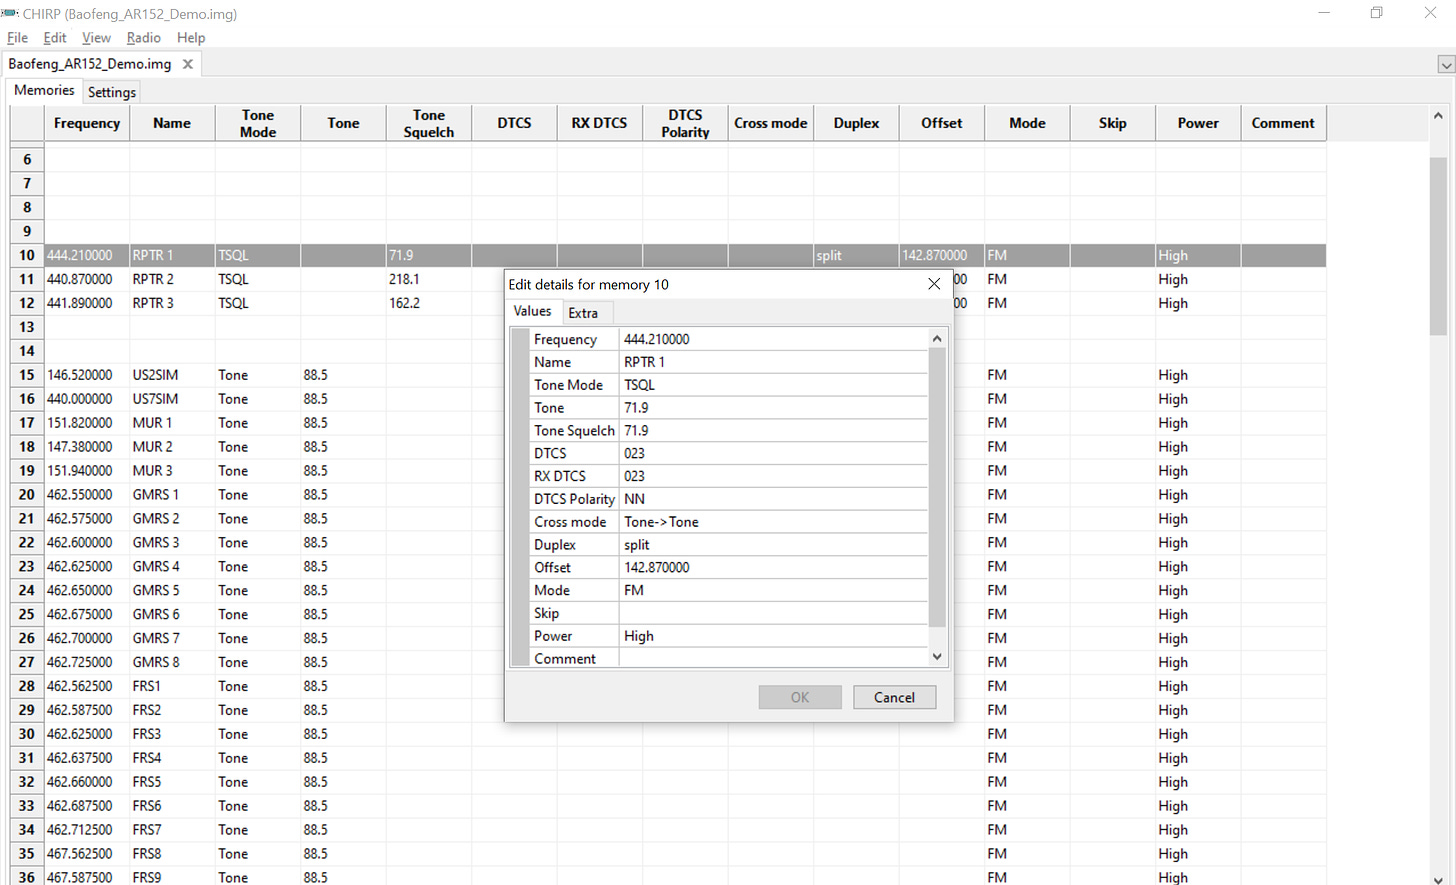
PROGRAMING A SPLIT FOR USE WITH A TACTICAL X-BAND REPEATER
Notice that the OUTPUT freq of the X-Band is in the “Frequency column” and the INPUT is in the “Offset column” with the “Duplex column” set to split.
These are all set to HIGH POWER output for max reach to hit the repeater.
CREATING A PRINTABLE CHEAT SHEET
You can download my “AR-152 Battery Cheat Sheet.pdf” and print at 50% to fit it to the battery. Using packing tape, I ‘m waterproofing the battery connection some and a range band covers the charging port.

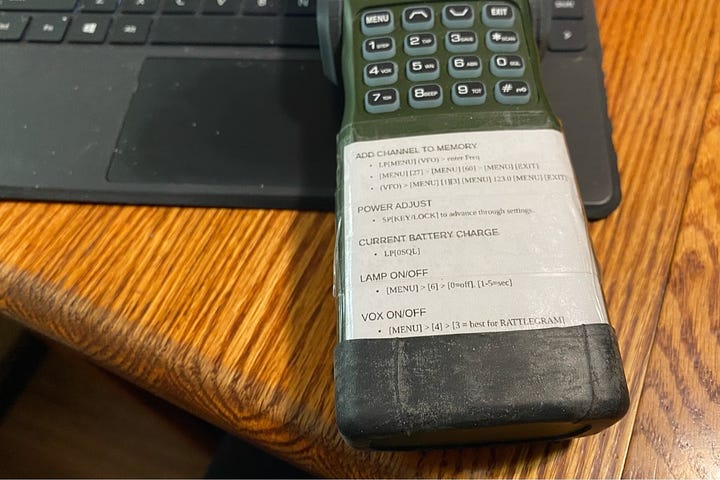
I recommend going through the manual and creating such a sheet off your needs to tape to the radio for quick access. I start at CH-60 when adding freqs as I left a gap from 60-70 for this purpose in my FREQ PLAN.
QUICK REFERENCE ITEMS
“SP”=Short Press(<2sec) “LP”= Long Press (2sec)
ADD CHANNEL TO MEMORY
LP[MENU] (VFO) > enter Freq > [MENU] [27] > [MENU] [60] > [MENU] [EXIT]
If CH-60 shows instead of 60, then it’s used… use up arrow to find next empty slot, OR delete with [MENU][28]
(VFO) > [MENU] [1][3] [MENU] 123.0 [MENU] [EXIT]
Sets CTSS
POWER ADJUST
SP[KEY/LOCK] to advance through settings.
CURRENT BATTERY CHARGE
LP[0SQL]
LAMP ON/OFF
[MENU] > [6] > [0=off], [1-5=sec]
VOX ON/OFF
[MENU] > [4] > [3 = best for RATTLEGRAM]
TOTAL RADIO RESET
MENU > 40 > MENU > MENU
4. USE IN THE FIELD
Field Hacks
O-ring for volume knob to keep from bumping the radio off or unwanted VOL UP/DN adjustment.
Tape over flashlight to prevent light ADs.
Ranger band for mic / plugging battery charging connection.
Tape over flashlight.
The 3D Printed Exo-Skeleton is a much better option to fix both issues while also preventing PTT & Emergency Button ADs also.
Enhancing / Degrading your signal via antenna choices.
By changing your antenna selection, you are able weaken your signal which by HAM standards is never considered, but for SHTF when your goal is not to be pickup by someone scanning the area, weak signals are a plus.
On the AR-152, the stock antenna is pretty lousy to start with and will work for when you want to lower your signal strength.
Upgrading to a better antenna like the BNC Gooseneck Antenna or Signal-Stuff BNC Super Antenna will allow longer contact, but it has the downfall of sending that signal in a 360deg pattern instead of to who you want it to go to.
Adding a YAGI will give best performance with the goal being the lowest power output and lowest profile as the directional signal is only being picked up in the direction it’s pointed.
Using Burst transmissions to lower your SIGINT exposure.
I recommend RATTLEGRAM for this as it’s plug and play.
Recharging and alternate power sources in the field.
Adding a female cigarette adaptor w/ alligator clip allows you to power the radio from almost any common source with the factory car charger cord.
USB Power pack w/ 5VDC (I have this for powering the cell phone already while in the field)







Great post, do you have a new source for the 3D printed exo skeleton. Thank you
Great write up PNW...